Lately, the Oculus Quest 2 (aka Meta Quest 2) is the greatest VR headset for almost anybody. The $299 headset permits you to play VR video games both sitting or strolling round. It runs as a standalone system or it could possibly tether to your PC and run PC-based VR video games both over a wired USB connection or Wi-Fi, the latter of which Oculus calls AirLink.
If you wish to play Minecraft in VR, there are 3 ways to try this on the Oculus Quest 2, every of which has its personal setup technique. The newest (and certain greatest) technique to make use of is QuestCraft, an unofficial port of Minecraft Java that runs as a standalone app on the headset and helps a wide range of mods in addition to roomscale monitoring. Nonetheless, it’s an unofficial port and so may break or be blocked by Mojang at any time.
Listed below are the professionals and cons of every technique, and we’ll clarify the right way to set up beneath.
| Technique | Professionals | Cons |
|---|---|---|
| QuestCraft (standalone) | Standalone (can play with out connecting to a PC) | Not formally supported |
| Finest efficiency | Most troublesome to put in | |
| Helps Cloth mods | No ray-tracing | |
| Helps roomscale | ||
| Minecraft for Oculus (Bedrock): Wired or Wi-fi | Best to put in | Solely helps add-ons no mods |
| Works nicely in multiplayer | No roomscale | |
| Different gamers can solely see your head transfer | ||
| Vivecraft (Minecraft Java): Wired or Wi-fi | Helps Forge mods | Laggiest technique |
| Helps roomscale | Multiplayer requires all gamers to have Vivecraft VR or non-VR Consumer put in | |
| Shifting arms whereas standing can break blocks, assault mobs | Server should have Vivecraft server plugin | |
| Row 10 – Cell 0 |
The right way to Set up QuestCraft: Standalone Minecraft VR for Oculus Quest 2
Whereas different strategies depend on you utilizing a PC to run the sport after which sending the VR photographs over a USB or Wi-Fi connection, QuestCraft permits you to run the sport fully on the Quest 2. It’s an unofficial port of Minecraft Java, so that you’ll must allow developer mode and sideload the APK, a course of which is pretty simple if you happen to comply with the steps beneath.
You’ll nonetheless want a official Minecraft Java account to log in and play QuestCraft. Nonetheless, because it’s an unofficial port, it’s at all times potential that future updates will break it.
1. Allow developer mode within the Oculus cellular app in your cellphone or pill. To get there, faucet Menu->Units->Developer Mode and toggle it to on.

2. Obtain and set up SideQuest, if you happen to don’t have already got it. This program permits you to sideload apps onto the headset.
3. Launch SideQuest with the Oculus plugged into your PC by way of USB. The app ought to detect your headset routinely. If that is the primary time, you will notice a immediate on the headset to permit USB debugging and also you’ll in all probability need to settle for “at all times enable from this laptop” so that you don’t get prompted once more.
4. Enter “questcraft” within the SideQuest search field and click on the highest consequence.

5. Click on Obtain App (Sideload). It should obtain and set up. A standing bar will rapidly present when it has completed however then disappear. In our case, the method took lower than 10 seconds.

6. Disconnect the headset and put it on.
7. Navigate to the apps menu on the Quest 2.

8. Choose “Unknown sources” from the pulldown menu.

9. Faucet QuestCraft to load it.

10. Click on Okay if requested about utilizing storage.
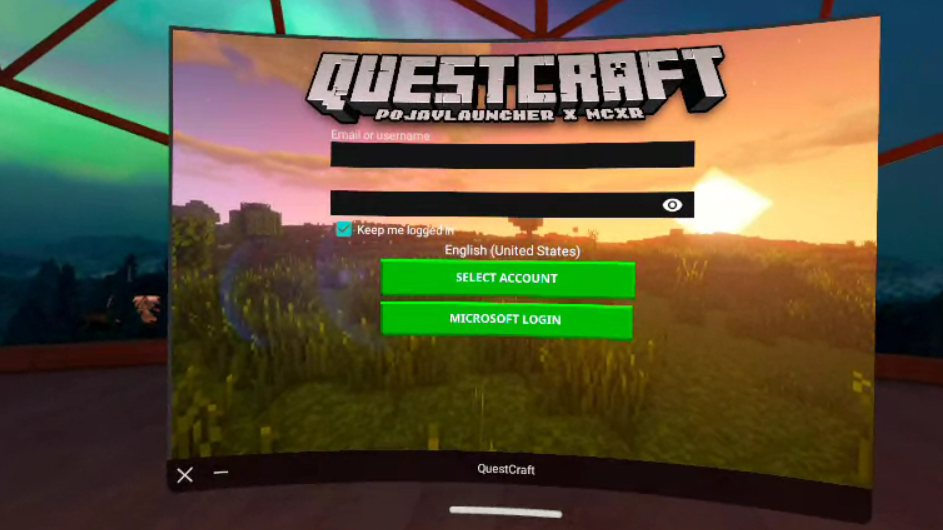
11. Click on Microsoft Login on the QuestCraft splash display and Enter your Microsoft account credentials if prompted.

12. Choose the renderer model gl4es 1.1.5 (Open GL ES 3), which is the third choice, by navigating to Settings->Video and Renderer->Renderer. This will likely or might not be mandatory as, in our testing, we didn’t want to do that. Nonetheless, the lead developer for QuestCraft wrote to us to say that you need to at all times choose the third choice, even when it is already chosen, or this system could not load so your expertise could differ.

13. Choose fabric-loader from the model dropdown menu and click on Play.

14. Click on Play Anyway if prompted to obtain OpenGL sources. Clicking Okay additionally works however could take longer.

It should take a number of moments to obtain property and cargo the sport. The display will flip black for a bit whereas it is loading. Don’t take off the headset or give up. When the display turns crimson, it’s virtually achieved loading.
Putting in mods in QuestCraft: You possibly can set up some, however not all Cloth mods in QuestCraft. To take action, merely join your Oculus Quest 2 to your PC and duplicate the mod information to the Android -> information -> internet.kdt.pojavlaunch.debug -> information -> .minecraftmods folder. Then begin the sport. If a mod is incompatible, the sport received’t launch or may have bugs. You possibly can see a community-maintained checklist of appropriate mods right here.

The right way to Configure Oculus Quest 2 to Work in Wired Mode
In case you don’t need to use QuestCraft, you’ll want to attach your Oculus Quest 2 to your PC by way of both wired or wi-fi (Wi-Fi) connection. That is true whether or not you need to use Vivecraft (Minecraft Java in VR) or Minecraft for Oculus. As you may guess, wired gives a lot better efficiency, with the apparent trade-off that you simply should be close to your laptop.
It virtually goes with out saying that your PC has to satisfy the very modest system necessities for Oculus Hyperlink (opens in new tab) to be able to run in wired or wi-fi mode. These embrace having a 4th Gen Core i5 or first-gen Ryzen 5 or increased CPU, Home windows 10 or 11, 8GB of RAM and a few type of discrete graphics. Minecraft’s system necessities are even decrease than these, however if you wish to use ray-tracing, you want an Nvidia RTX or Radeon RX 6000 collection graphics card.
1. Set up the Oculus desktop app in your PC if you happen to don’t have it already.
2. Launch the Oculus app.
3. Navigate to Units.

4. Click on Add Headset.

5. Choose Quest 2 and click on Proceed.

6. Choose Hyperlink (Cable) for wired connections. In case you want to use a wi-fi connection, skip to the part beneath on utilizing Air Hyperlink for wi-fi connections.

7. Join the Oculus Quest 2 to a USB 3 or quicker port in your PC and click on Proceed.
8. Navigate to Fast Settings on the headset and choose Oculus Hyperlink. So long as your controllers are paired with the headset, they’ll routinely connect with your PC.
The right way to Join Your Oculus Quest 2 to PC by way of Air Hyperlink
Air Hyperlink is Oculus’ system for connecting your Quest 2 headset to your PC by way of Wi-Fi. Air Hyperlink works with both Minecraft for Oculus (Bedrock) or Vivecraft (Java), however it’s the laggiest answer.
With the intention to work, each the PC and the headset should be related to the identical community. To scale back latency, It helps if the PC is related by way of Ethernet. If you’re utilizing a mesh community, be sure to configure the router to solely enable each units to make use of one node so they’re on the identical node (or else it received’t work).
1. Navigate to Units->Add Headset->Quest 2 within the Oculus desktop app as proven in steps 2 by means of 6 within the part above.
2. Choose Air Hyperlink and click on Proceed.

3. Navigate to Settings->Experimental Options on the Oculus Quest 2.
4. Toggle Air Hyperlink to on.

5. On the Fast Settings menu, click on Oculus Air Hyperlink.

6. Choose the PC you want to pair with and click on pair. A pairing code ought to seem in your PC’s display.
7. Click on Verify on the PC.
8. Click on Proceed and then Launch on the Oculus Quest 2.
The right way to Launch Minecraft for Oculus (aka Bedrock Version in VR)
The one first-party technique for taking part in Minecraft in VR is the best, however most limiting. If you have already got Minecraft Bedrock version put in (aka Minecraft for Home windows or non-Java Minecraft), establishing VR will take only a few seconds. Nonetheless, you received’t be capable to use mods like you’ll be able to with the opposite strategies.
1. Create a desktop shortcut to launch Minecraft VR utilizing the placement of minecraft://Mode/?OpenXR=true. To do that, right-click in your desktop and choose New->Shortcut. Enter minecraft://Mode/?OpenXR=true because the Location, click on Subsequent and identify your shortcut Minecraft VR (or one thing related).

2. Open the shortcut to launch Minecraft in your Oculus Quest 2. You’ll see Minecraft load in a Window in your desktop and on the headset view display on the identical time. It could take a number of seconds earlier than the title display seems.

The right way to Play Vivecraft (Minecraft Java VR) on Oculus Quest 2
Vivecraft, which is a third-party VR launcher for Minecraft Java, gives probably the most immersive VR expertise of any technique. With Vivecraft, you’ll be able to transfer your arms to carry out duties corresponding to attacking, one thing you’ll be able to solely do with the controller in different variations. You can even use Forge mods.
As with Minecraft for Oculus, Vivecraft requires a wired or wi-fi connection to your PC.
1. Obtain Vivecraft. There are a number of variations out there, relying on whether or not you need the most recent or one which helps Forge mods. As of this writing, model 1.16 was the most recent that helps Forge. Cloth mods are unavailable on any model. Be sure you don’t set up a model that has “NONVR” within the file identify. Be aware that Java is required to put in Vivecraft.
2. Launch the Vivecraft installer. In case you get a “Home windows protected your PC” message, click on “Extra information” after which “Run Anyway.”
Picture 1 of 2

3. Test “Set up Vivecraft with Forge” and click on Set up. This can assist you to set up mods if you want.

4. Click on Okay if prompted to shut Minecraft Launcher. Be certain it’s closed first.

5. Click on Okay.

6. Open the Oculus Desktop app and join your Oculus Quest 2 headset.
7. Launch Steam (set up it if it’s not already put in).
8. Launch SteamVR from inside Steam. If it’s not already put in, set up it.

9. Open Minecraft Launcher in your PC.
10. Ensure that Vivecraft is chosen from the model menu and click on Play.

Minecraft VR Controls on Oculus Quest 2
These controls apply to all variations of Minecraft on Oculus Quest 2 aside from Vivecraft.
- Y – opens stock
- X – opens the chat and brings up a digital keyboard
- B – fast actions menu which solely has fast chat
- A – soar
- Menu button – pause
- Left joystick – motion
- Proper joystick – rotating, turning
- Proper entrance set off – mine / assault / choose from menu
- Left entrance set off – work together / place
- Proper contact controller is cursor motion
These are the controls for Vivecraft.
- A – work together / place
- Y – opens stock
- B – fast actions menu
- X – pause
- Left joystick button – soar
- Left joystick – motion
- Proper joystick – rotating, turning
- Left entrance set off – teleport
- Proper entrance set off – mine / assault / choose from menu
MORE: Oculus Quest 2 Evaluation
MORE: Finest VR Headsets for PC and Gaming
MORE: Digital Actuality Fundamentals
Supply By https://www.tomshardware.com/how-to/play-minecraft-vr-quest-2